Risk Register in Health & Safety: Worked Example + Scoring

A risk register is a project management and risk management tool. It is used to spot potential risks associated with a project or organisation, occasionally to meet regulatory requirements, but usually to stay on top of concerns that could derail desired goals.
While the register is primarily used during project execution, it also belongs in your planning phase, because the earlier a risk is captured the more options you have to control it. It is never too early to start thinking about the hazards a project carries and how you will keep track of them.
The project risk register contains all the information about each detected risk, including its nature, level of impact, who owns it, and the mitigation measures in place to address it. This guide explains what a risk register is, what goes into one, how it differs from a risk assessment, and how to build and run one from scratch.
What Is a Risk Register?
A risk register is a single, living document that lists all the risks facing a project or organisation in one place. It moves risk out of people’s heads and into a shared record, so that every hazard has an owner, a score, and a plan. In health and safety it sits alongside your task-level risk assessments, giving managers a top-down view of where the biggest exposures are and whether they are being brought under control.
Most teams keep the register as a spreadsheet or in a dedicated tool, and review it at set intervals throughout the life of the project.
Purpose of a Project Risk Register
A risk register’s goal in project management is to keep track of all the hazards that have been discovered, along with their evaluation and the plans for dealing with them.
It is a log that lists risks, their severity, and the activities and steps that must be followed to reduce each one. Project managers use the register as a live management tool that keeps the project’s risk work visible, owned, and under control rather than scattered across notes and inboxes.
Components of a Risk Register
Most risk register templates share the same core fields. Mature frameworks such as ISO 31000 shape the detail, but the following aspects appear in almost every register:
- A name or ID number to identify a danger
- A clear summary of the danger in the risk description
- Risk breakdown structure: a table that categorises project hazards (schedule, money, technical, external)
- Risk analysis: the likelihood and consequence of the risk (qualitative or quantitative)
- Danger probability: calculate the probability of each risk
- Risk priority: a risk score calculated by multiplying risk impact and likelihood values
- Risk response: a strategy to limit the impact of each risk
A Risk Register Example
Seeing the fields laid out together makes the tool far easier to build than a list of definitions ever could. The short worked example below is for a construction project, but the same columns work for any sector. Read across each row and you can watch a single risk move from a plain description, through scoring, to a named owner and a planned response.
| ID | Risk Description | Category | Likelihood | Impact | Rating | Owner | Response |
|---|---|---|---|---|---|---|---|
| R1 | Fall from height during roof works | Safety | 3 | 5 | 15 | Site Manager | Edge protection, harnesses, permit to work |
| R2 | Groundworks strike a buried service | Safety | 2 | 4 | 8 | Foreman | CAT scan, service drawings, hand digging |
| R3 | Key subcontractor withdraws | Schedule | 3 | 3 | 9 | Project Manager | Pre-approved backup supplier |
| R4 | Silica dust exposure during cutting | Health | 4 | 4 | 16 | Safety Officer | On-tool extraction, RPE, health surveillance |
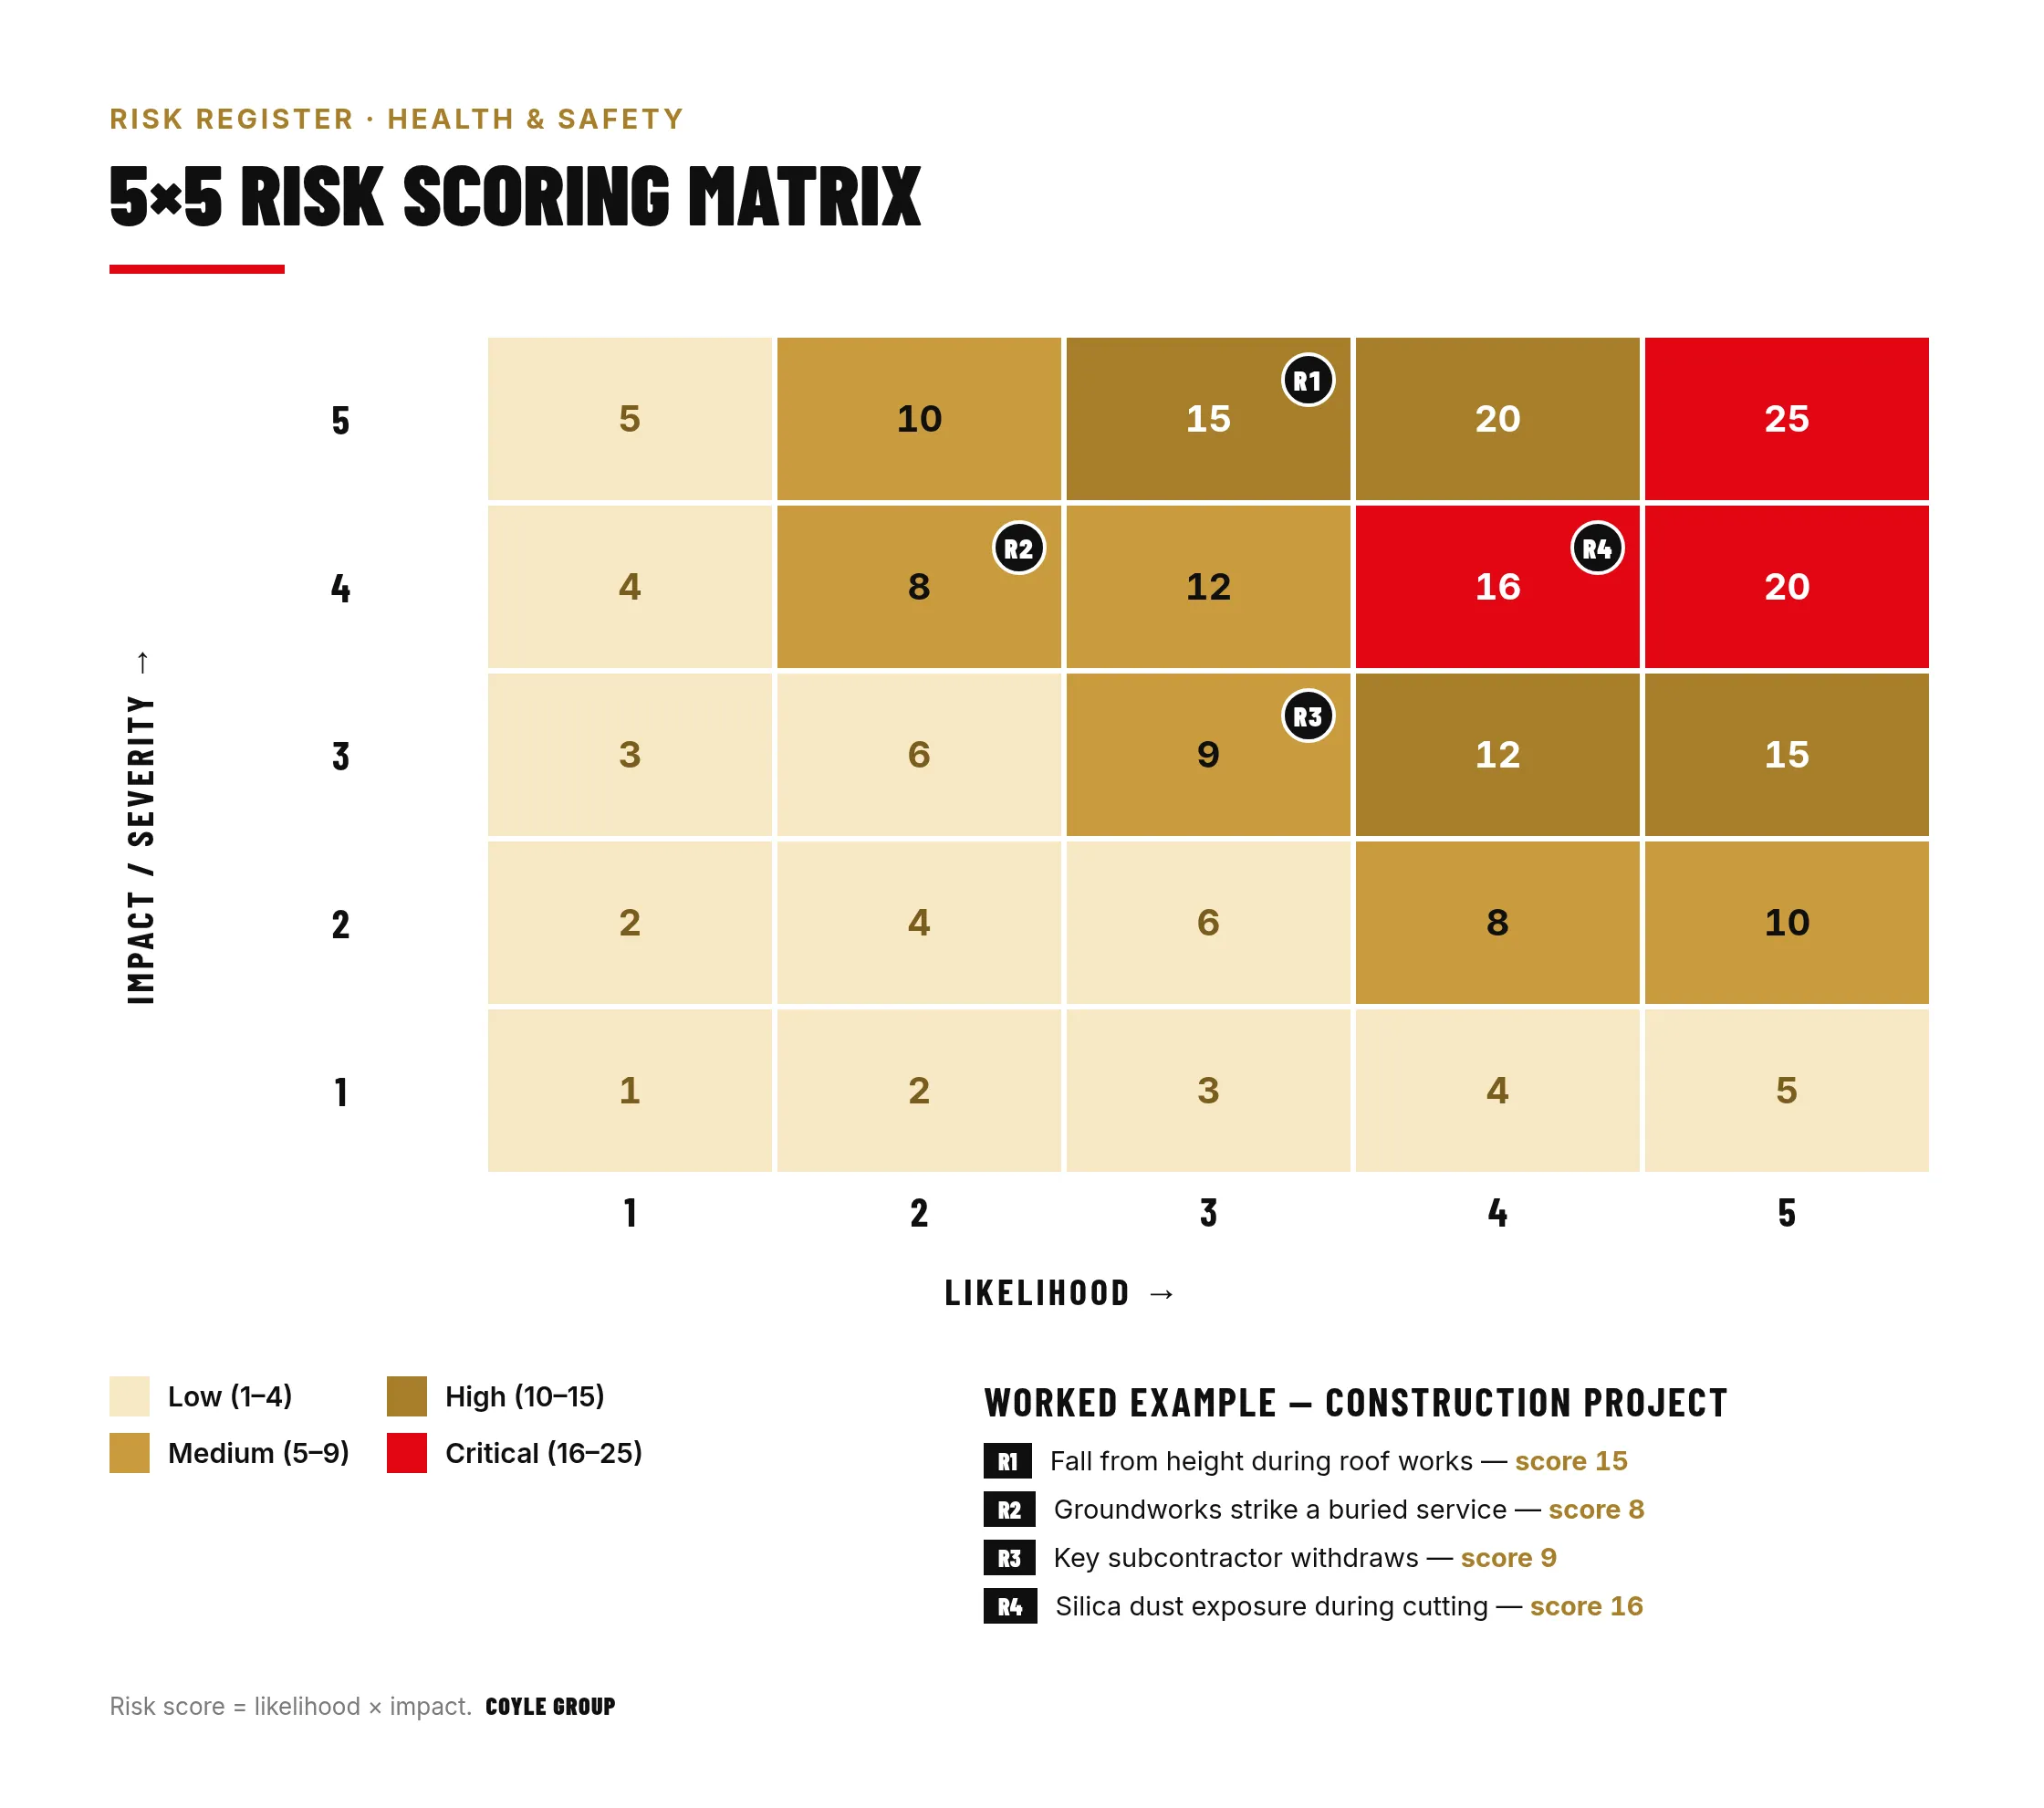
You can start from a blank spreadsheet with these columns, or download a ready-made risk register template and adapt it to your project. Whichever you choose, keep the safe systems of work that control each risk cross-referenced, so the register always links back to the practical controls on site rather than sitting apart from them.
Risk Register vs Risk Assessment
The two terms are often used interchangeably, but they do different jobs. A risk assessment is the process of examining a specific task, identifying its hazards, and deciding on the controls needed to reduce harm. A risk register is the higher-level log that collects those risks across a whole project or organisation, tracks their status over time, and records who is accountable for each one.
The infographic below sets the two side by side so the split is easy to see at a glance:
Risk Assessment
The task-level process
Risk Register
The project-wide log
Put simply, the risk assessment tells you what could go wrong with a task and how to control it. The risk register tells you, at a glance, every risk you are carrying, how serious each one is, and whether it is being managed. Most well-run projects use both, with findings from individual risk assessments feeding into the central register.
Risk Management Process
Risk identification is only the first stage in a wider risk management process that runs for the life of a project. The four steps below take you from spotting a risk, through recording and monitoring it, to closing it out once it has been dealt with, in line with the HSE’s risk management guidance. Work through them in order and every hazard ends up with an owner, a status, and a clear next action.
1. Gather information about the project’s risks
A systematic strategy ensures thoroughness. A project risk register can monitor a risk if it arises and analyse the steps taken to address it.
2. Make a list of the project’s risks
Document project hazards to identify risks, track their history, and assign each risk to the responsible worker.
3. Keep an eye on the project’s risks
Allocate risks to team members. That individual is then in charge of monitoring the risk and directing any risk response steps.
4. Resolve the hazards
Close the project risk once it has been resolved. Cross the danger off your risk record as no longer a project issue.
Because risks change as a project moves forward, these four steps are a continuous cycle rather than a one-off exercise. New risks are added, existing ones are re-scored, and resolved ones are closed, so the register always reflects the real state of the project. Where an incident crosses the reporting threshold, it should also be logged under RIDDOR and reported to the HSE.
How to Create a Risk Register
Building a register from scratch is more straightforward than it looks once you break it into stages. The four steps below move from agreeing how you will handle risk, through setting up the document, to identifying and scoring the risks themselves. Follow them in order and you end up with a register your whole team can actually use, rather than a document that is filled in once and forgotten.
1. Create a risk management plan
Define how you and your team will identify, analyse, and prioritise risk. Address:
- How are we going to recognise project risks?
- What methods will we employ to assess those dangers?
- How will we determine what to do if a threat materialises?
- What is the risk event’s communication strategy?
- Which stakeholders should be informed about project risks?
2. Create your risk register using your risk management strategy
Being thorough is crucial, but perfection can often be the enemy of progress. Project managers approach risk work as an ongoing, iterative process.
3. Recognise risk events and their potential consequences
Consider what makes you think you will miss a date. What is the source of that effect? It is possible to prevent a risk occurrence from becoming an issue if you can figure out what is causing it.
4. Assess, prioritise, and allocate risk
Assign risk ratings based on probability and impact. Risks with high probability and impact are emphasised in risk management plans.
None of this needs to be perfect on day one. The strongest registers start simple and are refined at every review, so treat your first version as a working draft and build the habit of keeping it current as the project moves on.
How to Conduct a Risk Assessment
Once risks are on the register, you need a consistent way to score them so the biggest exposures rise to the top. Scoring turns a subjective sense of “this feels risky” into a number you can rank and compare across the whole project. A score-based system of 1 to 10 is the approach most teams reach for.
Formula: Risk Value (RV) = Risk Occurrence Probability (P) x Risk Cost (C)
Example 1: a 20% possibility of losing electricity for a week (a 2-day cost): 0.2 (P) × 2 (C) = 0.4 days (RV)
Example 2: a 40% risk of losing a staff member for a week (a 5-day loss): 0.4 (P) × 5 (C) = 2.0 days (RV)
The second risk has a greater risk value and would be prioritised for mitigation.
Keeping Your Risk Register Working
A risk register is only as good as the discipline behind it, and keeping one current across a busy project takes time and judgement that most teams are stretched to spare. Setting one up properly, scoring risks consistently, and linking every entry back to real controls on site is where many organisations quietly come unstuck.
If you would rather get it right from the start, get expert compliance support: Coyle Group’s safety consulting service helps UK businesses build, populate, and maintain risk registers that stand up to scrutiny and keep their people safe.
Frequently Asked Questions (FAQs): Risk Registers
A few of the questions project managers and safety leads ask most often when they set up, own, and maintain a risk register.
What is a risk register?
A risk register is a project management and risk management tool used to spot potential risks associated with a project or organisation. It records each identified risk along with its nature, likelihood, level of impact, owner, and the mitigation measures in place.
Who owns the risk register?
Overall ownership usually sits with the project manager or the person accountable for the project or programme, who keeps the register current. Each individual risk is then assigned to a named risk owner who monitors it and drives the agreed response.
What is the difference between a risk register and a risk assessment?
A risk assessment is the process of identifying hazards and deciding on controls for a specific task or activity. A risk register is the live log that collects those risks across a whole project or organisation, tracks their status, and shows who owns each one until it is closed.
What are the components of a risk register?
A typical risk register includes a risk ID, a description, the category, a likelihood and impact score, a calculated risk rating, the named owner, the planned response, and the current status of the risk.
How often should a risk register be reviewed?
Review the register at the intervals set out in your risk management plan, and always after a significant change to the project, a new hazard, or an incident. On active construction and engineering projects that usually means a monthly review as a minimum, with high-scoring risks checked more often until they are brought under control.
What tools can you use to build a risk register?
Many teams start with a simple spreadsheet, which is enough for smaller projects, while larger programmes use dedicated risk or project management software that links each risk to tasks, owners, and actions. The tool matters far less than keeping the register current and making sure every risk has a named owner and an agreed response.
When should you create a risk register?
Start the register as early as the planning phase, before work begins, so risks are captured while there is still time to design them out. It then stays live throughout delivery, with new risks added as they emerge and closed risks archived, giving you a running record of every exposure the project has carried.